Motivation
GitHub's ability to generate HTML from Markdown is probably one of it's most widely recognized features. What if you are locked into another solution, but still want to generate GitHub inspired documentation?
Goals
- Easily generate GitHub styled documentation from Markdown files
- Markdown files are committed to git and live with your code
- Documentation site is updated when you push changes
High level design
- Use Statiq.Framework to:
- convert markdown to HTML
- provide page templating
- Use github-markdown-css for styling
- Use Prism for syntax highlighting
Convert Markdown to HTML
We'll use Statiq.Framework which is a powerful static generation framework as the base of our application. The Statiq.Framework has built-in modules to perform Markdown to HTML rendering as well as templating using ASP.NET's Razor syntax.
Create a new console application:
dotnet new console -o DocGenerator
Install Statiq NuGet packages
dotnet add package Statiq.App --prerelease
dotnet add package Statiq.Markdown --prerelease
Note: As of March 2021, this package is still in beta so we'll need to add
--prerelease
Create the Statiq.Framework bootstrapper by adding the following for to your Program.cs
using System.Threading.Tasks;
using Statiq.App;
using Statiq.Markdown;

namespace DocGenerator
{
  public class Program
  {
    public static async Task<int> Main(string[] args) =>
      await Bootstrapper
        .Factory
        .CreateDefault(args)
        .BuildPipeline("Render Markdown", builder => builder
            .WithInputReadFiles("**/*.md")
            .WithProcessModules(new RenderMarkdown().UseExtensions())
            .WithOutputWriteFiles(".html"))
        .RunAsync();
  }
}
We've created a simple Statiq pipeline that will read all markdown files, process them using RenderMarkdown(), and output the rendered HTML.
Note:
.UseExtensions()enables markdown pipe tables and a number of other Markdig features.
Let's test what we've built so far by creating a new markdown file.
Create a new markdown file at /input/index.md.
# My Header

Yo
Note: by default, Statiq processes files in
/input
Run your app to render your index.md as index.html
dotnet run
Running the app will create a new /output folder. Inside the /output folder you should see your new index.html with the rendered HTML.
<h1>My Header</h1>
<p>Yo</p>
Simple, but not really that useful yet. Let's add a page template.
Page Templating
Next, let's add support for Razor templates. This will allow us to create a template for our documentation pages so that each page has the same look and feel. It also will provide us with a place to ensure our javascript and CSS is loaded on each page.
Add the Statiq.Razor NuGet package
dotnet add package Statiq.Razor --prerelease
Update your Program.cs to include the RenderRazor() module in your pipeline.
using System.Threading.Tasks;
using Statiq.App;
using Statiq.Markdown;
using Statiq.Razor; // <-- added

namespace DocGenerator
{
  public class Program
  {
    public static async Task<int> Main(string[] args) =>
      await Bootstrapper
        .Factory
        .CreateDefault(args)
        .BuildPipeline("Render Markdown", builder => builder
            .WithInputReadFiles("**/*.md")
            .WithProcessModules(
                new RenderMarkdown().UseExtensions(),
                new RenderRazor().WithLayout("/_layout.cshtml")) // <-- added
            .WithOutputWriteFiles(".html"))
        .RunAsync();
  }
}
Add a razor view template at /input/_layout.cshtml. Let's start with something simple. This template will take our markdown file and render the HTML in place of the @RenderBody()
<!DOCTYPE html>
<html lang="en">
<head>
</head>
<body>
    @RenderBody()
</body>
</html>
Run your application again.
dotnet run
Your /output/index.html should now look like this.
<!DOCTYPE html>
<html lang="en">
<head>
</head>
<body>
    <h1>My Header</h1>
    <p>Yo</p>
</body>
</html>
You can see the content of our markdown rendered in place of @RenderBody()
GitHub Styling
Let's leverage the razor template we've setup to apply GitHub CSS styling.
To enable GitHub CSS styling, we'll use the wonderfully simple github-markdown-css.
Update your _layout.cshtml to include the GitHub styling.
<!DOCTYPE html>
<html lang="en">
<head>
    <link href="https://cdnjs.cloudflare.com/ajax/libs/github-markdown-css/4.0.0/github-markdown.min.css" rel="stylesheet" type="text/css">
    <style>
        .markdown-body {
            box-sizing: border-box;
            min-width: 200px;
            max-width: 980px;
            margin: 0 auto;
            padding: 45px;
        }
    </style>
</head>
<body class="markdown-body">
    @RenderBody()
</body>
</html>
Note: this example is loading the styling remotely from CDNJS.
Run your application.
dotnet run
Open your test.html file in a web browser and you should see your content looks similar to GitHub.
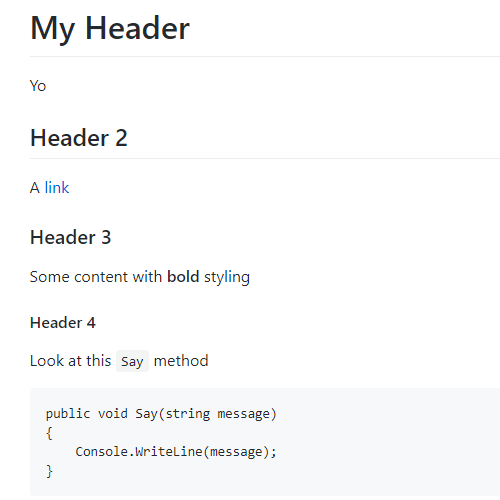
It's looking better but we don't have any syntax highlighting for that code snippet.
Code Syntax Highlighting
There are quite a few different code syntax highlighter libraries out there to choose from. For this example, we'll use Prism. It's easy to setup and supports a number of different languages.
Like the GitHub styling above, we'll load the necessary assets using CDNJS.
Update your /input/_layout.cshtml to include the Prism stylesheet and javascript.
<!DOCTYPE html>
<html lang="en">
<head>
    <link href="https://cdnjs.cloudflare.com/ajax/libs/github-markdown-css/4.0.0/github-markdown.min.css" rel="stylesheet" type="text/css">
    <link href="https://cdnjs.cloudflare.com/ajax/libs/prism/1.23.0/themes/prism.min.css" rel="stylesheet"> <!-- Added -->
    <style>
        .markdown-body {
            box-sizing: border-box;
            min-width: 200px;
            max-width: 980px;
            margin: 0 auto;
            padding: 45px;
        }
    </style>
</head>
<body class="markdown-body">
    @RenderBody()
    <script src="https://cdnjs.cloudflare.com/ajax/libs/prism/1.23.0/components/prism-core.min.js"></script> <!-- Added -->
    <script src="https://cdnjs.cloudflare.com/ajax/libs/prism/1.23.0/plugins/autoloader/prism-autoloader.min.js"></script> <!-- Added -->
</body>
</html>
Run your application again.
dotnet run
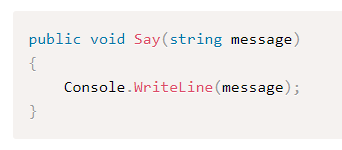
Open /output/index.html in a web browser and your code now has syntax highlighting.
Fix Broken Links
Once you move past the single page example, there is a problem with the way links are handled. As you create your markdown content, you'll likely want to link to other markdown documents:
[other document](other-document.md)
The problem is that when the link is rendered as HTML using the RenderMarkdown pipeline, it doesn't swap the .md extension to .html
Here's what the rendered HTML looks like:
<a href="other-document.md">other document</a>
other-document.md doesn't exist in our /output folder and so the link will not work.
Fortunately, Statiq.Framework is quite flexible and offers a number of ways for us to correct the link extensions. Let's create a new output module and plug that into the pipeline.
Here's a naive implementation of a module that inspects the rendered HTML and replaces tags ending in .md with .html
Note: This code is not optimized for very large files and the regular expression matching is fairly crude but it's enough to get you started.
using Statiq.Common;
using System.Collections.Generic;
using System.Linq;
using System.Text.RegularExpressions;
using System.Threading.Tasks;

namespace DocGenerator
{
    public class ReplaceMarkdownLinksWithHtml : Module
    {
        protected override Task<IEnumerable<IDocument>> ExecuteContextAsync(IExecutionContext context)
        {
            var documents = new List<IDocument>();

            foreach (var document in context.Inputs)
            {
                using (var reader = document.ContentProvider.GetTextReader())
                {
                    var content = reader.ReadToEnd();
                    var regex = new Regex("\\.md\">");
                    var newContent = regex.Replace(content, ".html\">");

                    var contentProvider = context.GetContentProvider(newContent);
                    var newDocument = document.Clone(contentProvider);
                    documents.Add(newDocument);
                }
            }

            return Task.FromResult(documents.AsEnumerable());
        }
    }
}
Now that we have our new module, we need to plug in a new output module. At this point in the pipeline, our markdown has been rendered as HTML. Update your Program.cs to match the following:
public static async Task<int> Main(string[] args) =>
    await Bootstrapper
        .Factory
        .CreateDefault(args)
        .BuildPipeline("Render Markdown", builder => builder
                .WithInputReadFiles("**/*.md")
                .WithProcessModules(
                    new RenderMarkdown(),
                    new RenderRazor().WithLayout("/_layout.cshtml"))
                .WithOutputModules(new ReplaceMarkdownLinksWithHtml()) // <-- added
                .WithOutputWriteFiles(".html"))
        .RunAsync();
Run your application again.
dotnet run
Inspect the HTML in your /output folder again. All links pointing to .md should now be replaced with .html
<a href="other-document.html">other document</a>
You can stop at this point if all you need is text and code syntax highlighting.
Including Other File Types
Your documentation will likely contain files other than just markdown. You might want to include images, text files, or even custom CSS.
To include other file types in your pipeline's /output, add another stage to the pipeline. In this example, we'll call it "Copy Files" and use the CopyFiles module from Statiq.Core. The module accepts an array of string parameters with the glob pattern.
public static async Task<int> Main(string[] args) =>
    await Bootstrapper
    .Factory
    .CreateDefault(args)
    .BuildPipeline("Render Markdown", builder => builder
        .WithInputReadFiles("**/*.md")
        .WithProcessModules(
            new RenderMarkdown(),
            new RenderRazor().WithLayout("/_layout.cshtml"))
        .WithOutputModules(new ReplaceMarkdownLinksWithHtml())
        .WithOutputWriteFiles(".html"))
    .BuildPipeline("Copy files", builder => builder // <-- added
        .WithProcessModules(new CopyFiles("**/*.jpg", "**/*.png", "**/*.css"))) // <-- added
    .RunAsync();
Now any .jpg, .png, or .css file located in /input will be copied to the /output directory when the pipeline is run.
Automatically Deploy
There are an almost endless number of options here and how to accomplish this will vary based on your build setup and hosting location. However, the basic idea is this:
- Pull git repo(s) that contain markdown documentation
- Move repo contents, or document specific subdirectories (i.e.
/docs) to/input - Run your document generation app
- Copy the
/outputcontents to your web site hosting location - View your GitHub inspired docs!